Bedroom Refresh (Part 1): DIY Picture Frame Moulding
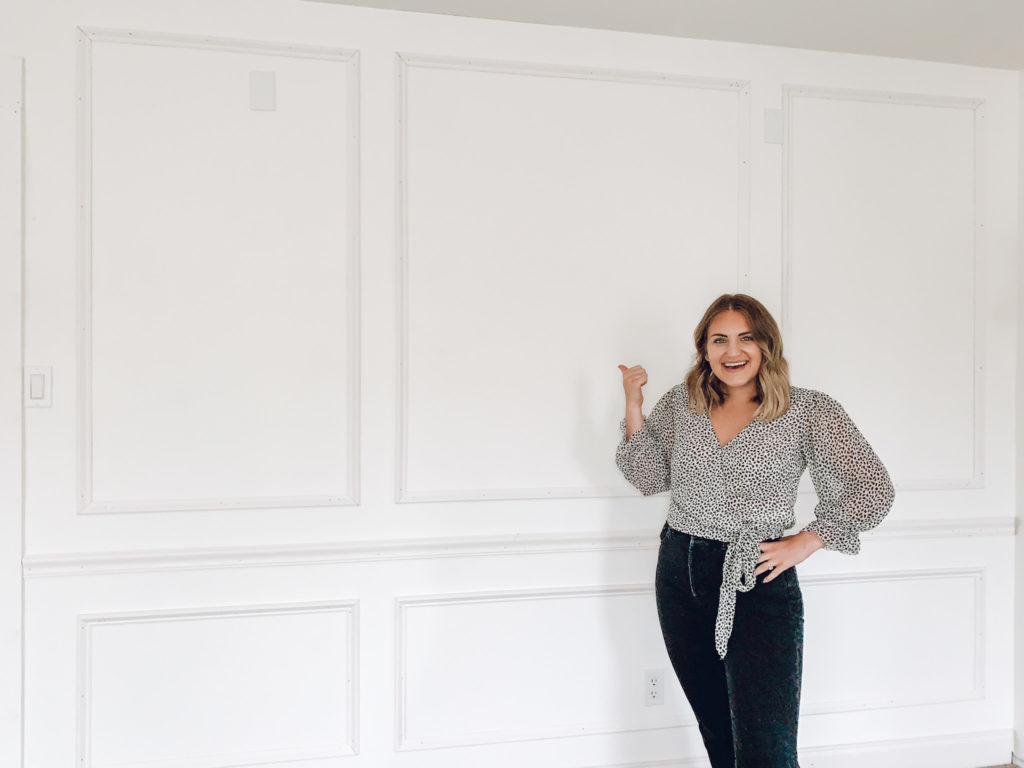
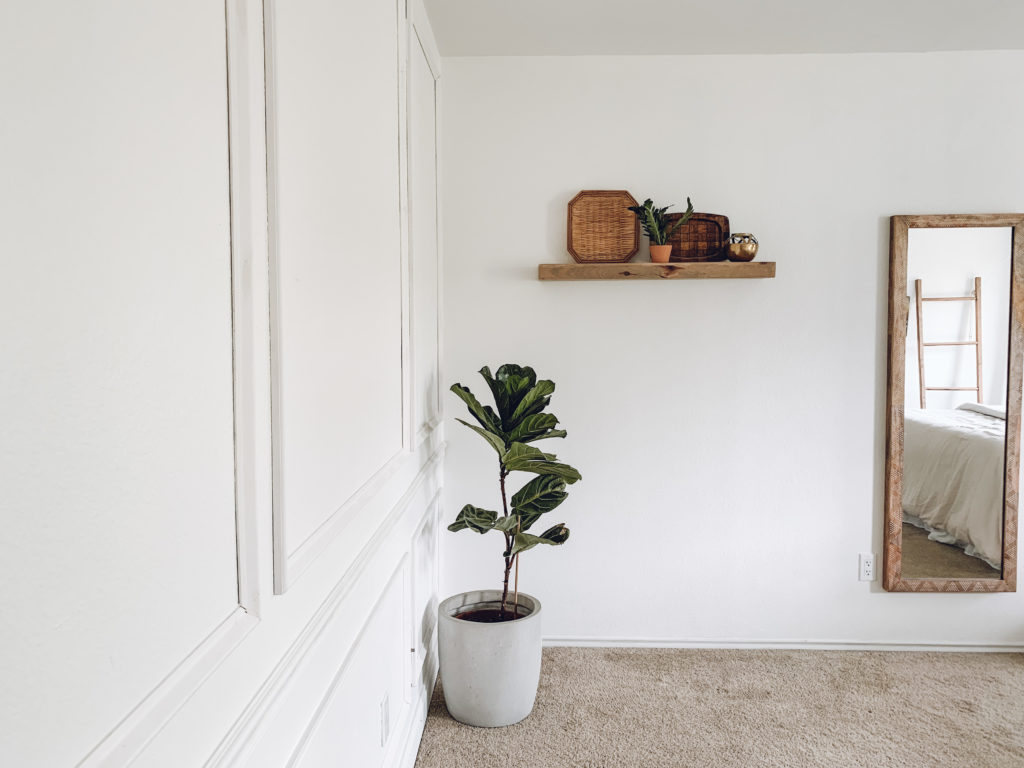
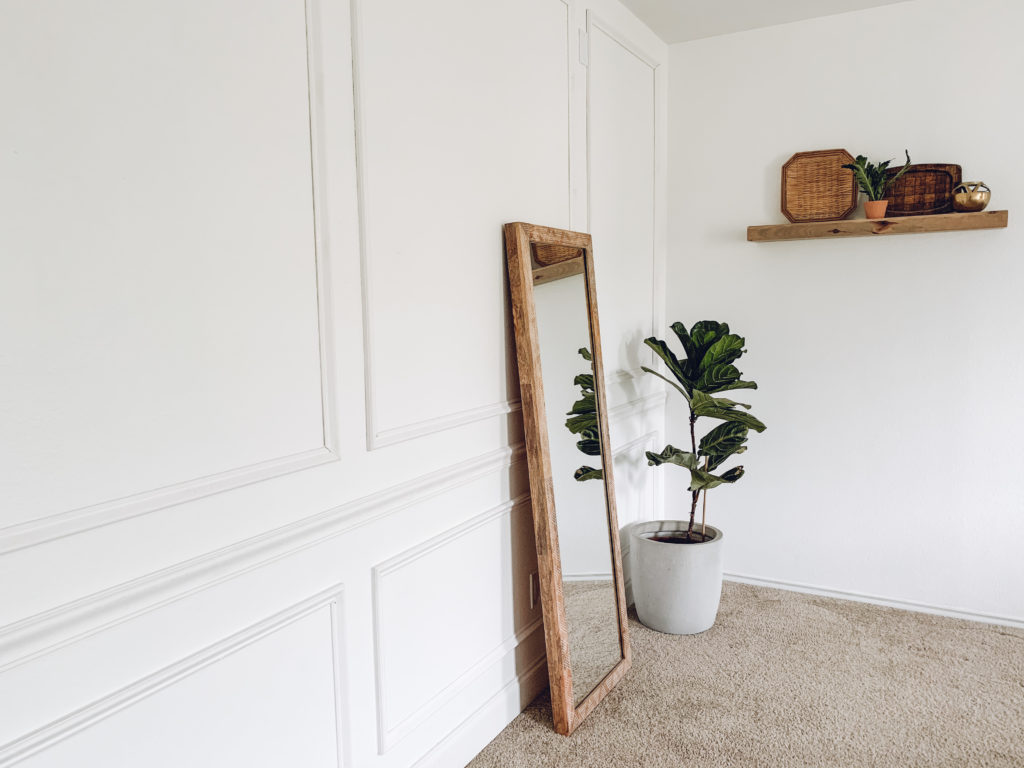
If you caught my Design Process post a few weeks back then you’re familiar with my bedroom refresh plans and inspo! Well I’m here to tell you that phase one is underway and I’m in loooove. Last weekend Taylor and I installed picture frame moulding on the wall facing our bed. When I wake up and see that wall for a split second I think I’m in a wealthy English manor and will soon be presented with tea and crumpets. Then I realize that I am, in fact, in my own home and that we made that wall with OUR BARE HANDS (& power tools). It might be my favorite thing we’ve done in this house! So today I’m sharing all the details on how we created our DIY Picture Frame Moulding for Part 1 of our Bedroom Refresh.
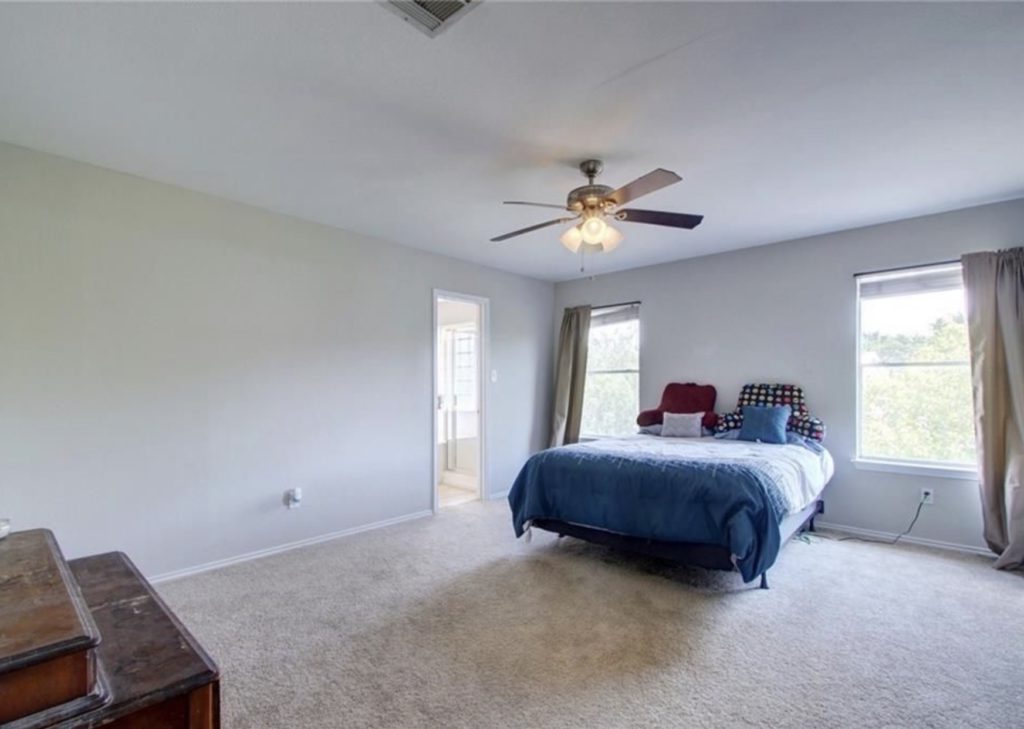
When we got the keys to the house, our bedroom was lacking. We went ahead and painted the walls before moving in furniture. I chose to do a black accent wall behind the bed after being inspired by a few photos on Pinterest and I still love it!
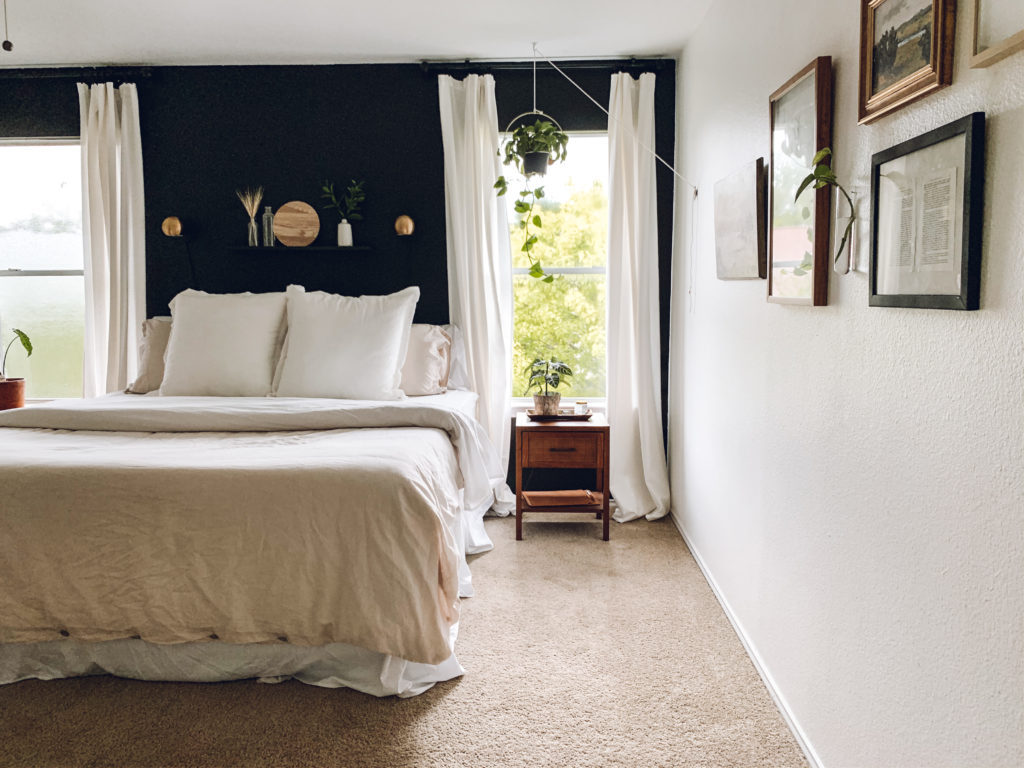
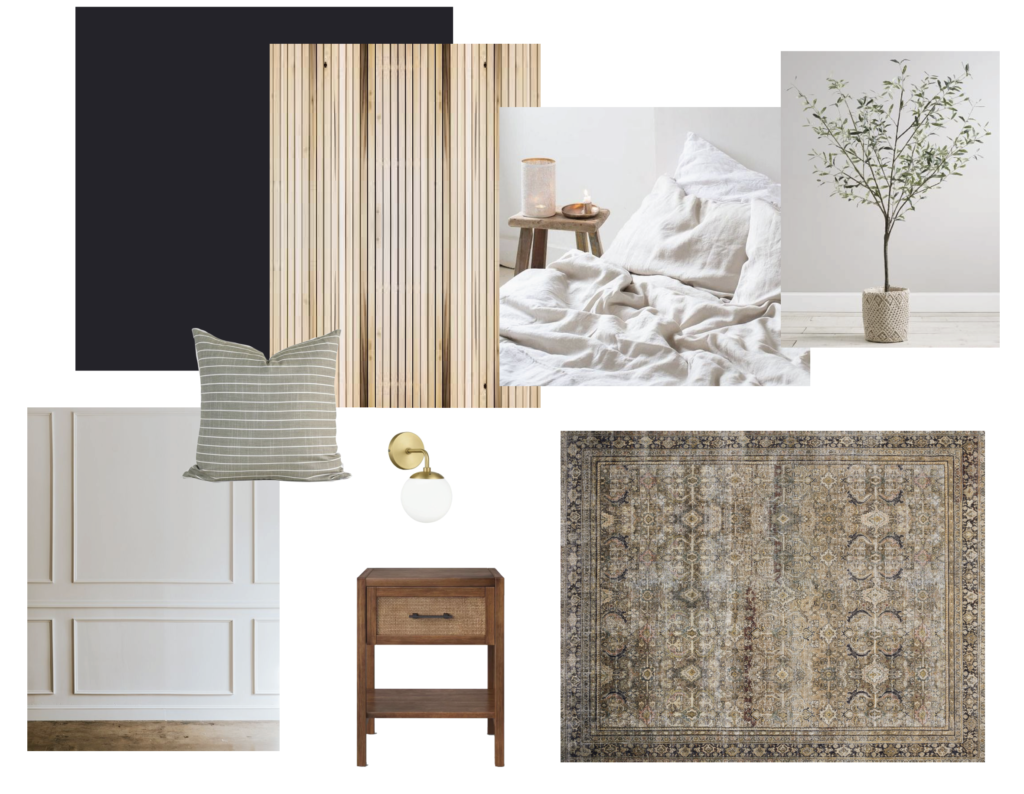
Now that we’ve had some time to live in it, I’m ready to update the rest of the room. Here are the plans for the bedroom refresh:
The wall facing our bed seemed like a nice place to start since it was already a blank slate. We sold our dresser a few months back and are still hunting for the perfect replacement so this was essentially just a white wall with nothing on it. We updated the baseboards and door trim and got started on the moulding.
DIY Picture Frame Moulding
Materials:
- chair rail
- base cap moulding
- caulk (must be paintable!)
- wood filler (we used DAP spackling paste)
- laser level (doesn’t have to be a laser but it helps BIG TIME)
- miter saw
- measuring tape
- nail gun
Planning Your Measurements
1. Measure the wall. This is the most important step! It helps to sketch it out and then draw in your chair rail. Chair rails are typically installed 1/3 of the way up the wall.
2. Choose your spacing between the boxes and ceiling/baseboards. It helps to keep it all consistent. I went with 4″ between the boxes on all sides (including the distance from the ceiling to the top boxes and the floor to the bottom).
3. Find your layout. With this being a smaller wall, I chose to do a large center box with two narrower boxes on either side. Once you have your layout and know your spacing, the rest comes fairly easily.
4. Finalize your measurements. Go to your original sketch and add your boxes and measurements in.
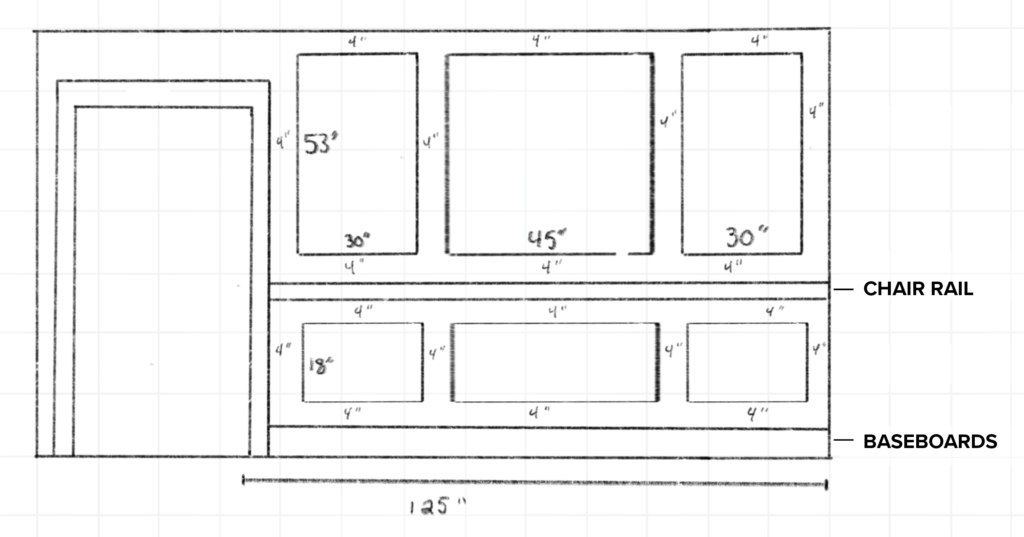
If you’re happy with the end sketch, add up all your measurements and you have your shopping list!
Installation
Once you purchase your materials, there’s a million ways to approach the installation. I’m going to preface this by saying we aren’t experts by any means, so there could be a better way to do it. However, we found this to be simple and painless! All in, the whole process took about 3 hours.
Some people choose to use liquid nails in addition to nailing the moulding to the wall. We opted to just use nails so we could easily remove it without damaging the drywall later and because nails alone worked just fine!
1. Cut and install the chair rail. This is the best place to start. Just in case your measurements were off in the planning phase (ours were slightly off), you can now install based on the spacing from the chair rail. Measure 1/3 up the wall, cut your piece to size and nail it in place.
2. Measure again! I know it isn’t fun, but it’s a whole lot easier in the long run if you verify your measurements are correct on the actual wall before you make any cuts.
3. Make ALL your cuts. Yep, you read that right. Cut all your pieces to size, using only mitered cuts (in opposite directions).
4. Set up your laser level. If you’re using a laser level (which we HIGHLY recommend for this project), go ahead and get it set up for your first piece. We started with the bottom left box and installed the left piece first, with the laser 4″ away from the door frame.
5. Nail in your frames! It’s as easy as that. It really helped to have two people. I would hold the piece in place, lining it up with the laser level and making sure the spacing was right, and Taylor would come behind me and nail the piece in.
6. Caulk, fill nail holes, paint. Once you’re done installing, caulk all your edges, fill your nail holes and paint your trim!
TA-DA!! You’re all done. Like I said, totally painless! Here’s how our wall turned out
Disclaimer: this post may contain affiliate links, meaning I get a commission if you decide to make a purchase through my links, at no cost to you.


Love how this turned out, Riley! Excited to try this in our new home using your tutorial!
Thanks, Jamie! Soo excited you’re going to give it a try! Congrats on buying a home 🙂